Exoplanet Watch - EXOTIC Downloadable Version for Advanced Participants
How to Analyze Your Exoplanet Observations
Note: these instructions are for advanced participants who have their own telescopes, have a lot of data to process, and want to process it on their own computer instead of in the cloud. If you are looking for an easier, platform-independent way to use EXOTIC, use the Google Colab version, here:
- How to use EXOTIC on the Colab video (video captions/transcript coming soon)
- EXOTIC: Google Colab Cloud Version (includes step-by-step instructions)
What is Data Analysis?
Astronomers routinely make use of observations from both ground- and space-based telescopes. Often, these observations are in the form of pictures (typically in FITS format) and need to be analyzed (also commonly called "reduced") in order to extract their scientific content. For transiting exoplanets, astronomers need to monitor changes in the observed brightness of the star as the planet passes in front of it. These graphs showing a star's change in brightness during planet transits are called "lightcurves".
What Should I Use to Analyze my Data?
Once you collect your lightcurve data (either with your own telescope or a robotic one), the next step would be to use a data reduction tool to convert your image files into a transit lightcurve, which will measure the planet passing in front of and partially blocking its host star.
Exoplanet Watch's official (and free!) data reduction software is the EXOplanet Transit Interpretation Code (EXOTIC). Below, we provide some helpful instructions and links to use EXOTIC on your own exoplanet transit observations.
Alternatively, you can use any other reduction code that you would like -- as long as the data is in the correct format for uploading to the AAVSO Exoplanet Database.
Exoplanet Watch's EXOplanet Transit Interpretation Code (EXOTIC)
EXOTIC, the official data reduction pipeline of Exoplanet Watch, is a free Python3 package for reducing observations (raw FITS images) of transiting exoplanets into lightcurves. It can calibrate your data (i.e., with flats, darks, and biases) and then choose the ideal combination of comparision star, aperture, and sky annulus to extract a transit lightcurve. It then fits your observed transit with a model lightcurve to calculate the transit depth (which measures the size of the planet relative to its host star) and mid-transit time (which helps us more accurately calculate future transits).
EXOTIC can run on a Windows, Macintosh, or Linux/Unix computer. You can also use EXOTIC via the free Google Colab, which features cloud computing, many helpful plotting functions, and a simplified installation. However, if you are a user with many images or large images, we recommend running EXOTIC locally on your own computer.
Download EXOTIC and Run it Locally On Your Own Computer
- Features: Images are read off of the user's hard drive -- nothing is uploaded to Gdrive. This method can be helpful for those with large filesizes, many files, or a slow internet connection.
- Limitations: Requires user to install Python3 and multiple subpackages.
- Installation Instructions:
- Windows
-
NOTE: EXOTIC will not work on the newest Python versions- you must use 3.10.11. If you have a newer version of Python, I’d recommend you uninstall it from your computer and then restart your computer for good measure before continuing with these instructions.
- Install Python 3.10.11 via this link here.
- Note: Make sure you check the two boxes on the first installation screen:
- Use admin privileges when instally py.exe.
- Add python.exe to PATH
- Restart your computer.
- Install Microsoft Visual Studio - use this direct link here. Make sure that you install the “Desktop Development with C++” package.
- Restart your computer.
- Install ultranest following these instructions: Installation — UltraNest 3.6.1 documentation (johannesbuchner.github.io)
- What worked for me was to go to their Github page here
- Then I clicked the green “<> Code” button and selected “Download Zip”. Or you can just click this link here.
- Find this zip file on your computer (in your Downloads folder) and unzip it by right clicking on it and selecting “Extract”
- Then open a new Command Prompt striking the Windows button on my keyboard, typing in “Command Prompt” and then hitting Enter.
- Then navigate to your Downloads folder by typing in: cd Downloads/UltraNest-master/Ultranest-master and hit Enter
- Then type: python setup.py install
- It should work. If not, please request help on our Slack workspace in the #exotic channel.
- Download EXOTIC directly from our Github
- Navigate to the EXOTIC fold (should be in your Downloads), unzip it by right clicking on it and select “Extract” and then open the unzipped folder until you see a file called run_exotic_windows. Double click on that file and EXOTIC will automatically install all of the remaining scripts and then it’ll launch EXOTIC.
-
- Mac
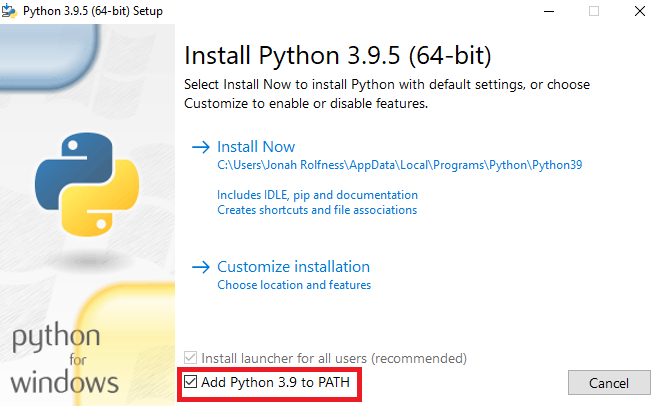
- Download and install the latest release of Python
please download and install the latest release of Python, even if you have a previous installation already on your computer, to ensure that all Python packages are properly installed.
NOTE FOR WINDOWS USERS: make sure to check the box "Add Python to PATH" when installing. (See image below)
- Download the latest release of EXOTIC.
The latest release of EXOTIC is at the top of this page and is labeled with a green circle with green text that says "Latest Release". Then, click on the blue underlined text that says "Source code (zip)" - Unzip this file.
- Double-click on the appropriate installer for your operating system:
- Windows: run_exotic_windows.bat
- Macintosh: run_exotic_macintosh.command
- Linux: run_exotic_linux.sh
- If you get a security warning about the software being from an unidentified, unsigned, or non-trusted developer, you can bypass it by
- Windows: click "More info" and then the "Run anyway" box at the bottom of the window.
- Macintosh: Please follow these instructions.
- Download and install the latest release of Python
- Linux
- Download the latest release of EXOTIC.
The latest release of EXOTIC is at the top of this page and is labeled with a green circle with green text that says "Latest Release". Then, click on the blue underlined text that says "Source code (zip)" - Unzip this file.
- Double-click on the appropriate installer for your operating system:
- Linux: run_exotic_linux.sh
- Download the latest release of EXOTIC.
- Windows
- We also recommend that you download our sample transiting exoplanet dataset to confirm that EXOTIC is running correctly on the Google Colab Cloud or your own computer.
- How EXOTIC Works
How to Run EXOTIC Locally on your Computer using the Sample Data
1. Download the Sample Data by clicking on "Source Code (zip)" and unzip the file.
2. Launch EXOTIC by double-clicking on the appropriate installer for your operating system:
- Windows: run_exotic_windows.bat
- Macintosh: run_exotic_macintosh.command
- Linux: run_exotic_linux.sh
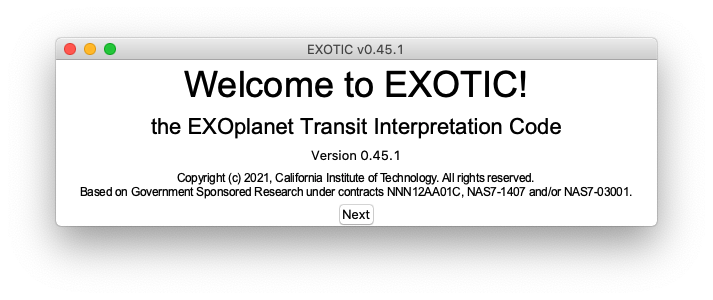
3. A new loading screen will pop up where you will see many required packages being automatically installed and updated. If this is your first time running the code, this can take up to a few minutes, depending on your internet connection.

4. After EXOTIC finishes loading, you will see a welcome screen. Click Next to proceed.
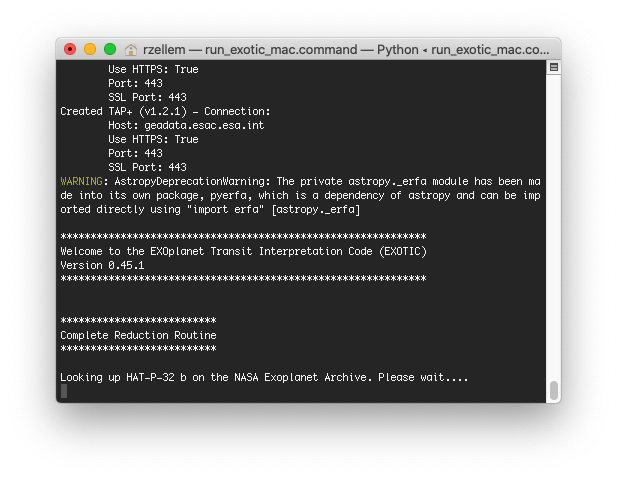
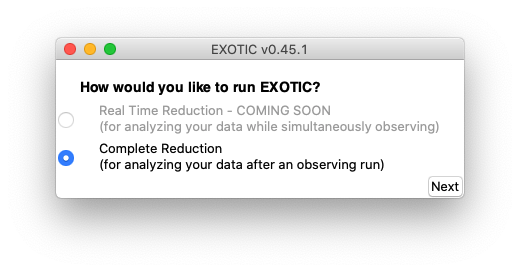
5. Select how you want to use EXOTIC - either in "Real Time Reduction" (for quickly analyzing your data while simulatenously observing) or in "Complete Reduction" (for analyzing your data after an observing run). Since we already have our sample data on our computer hard drive, we will select "Complete Reduction" and click Next.
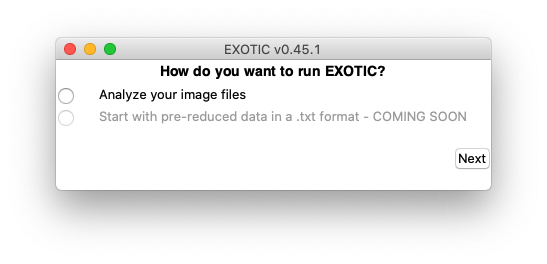
6. Select how you want to run EXOTIC: either by starting with raw image files (typically in FITS format or similar) or by starting with pre-reduced data (i.e., data already reduced with other software). Since we want to fully analyze our sample data, which are image files, we will select "Analyze your image files" and click Next.
7. Select how you would like to enter information about your observing run (e.g., location, sky conditions, position of the target and comparison star(s) on the detector, etc.). For our sample data run, select "Manually".
- Note about choosing comparison stars: The AAVSO has a Variable Star Plotter service that can display your field of view (FOV) with stars designated as good ones to use for comparision stars. Please see their Help Guide for more details.

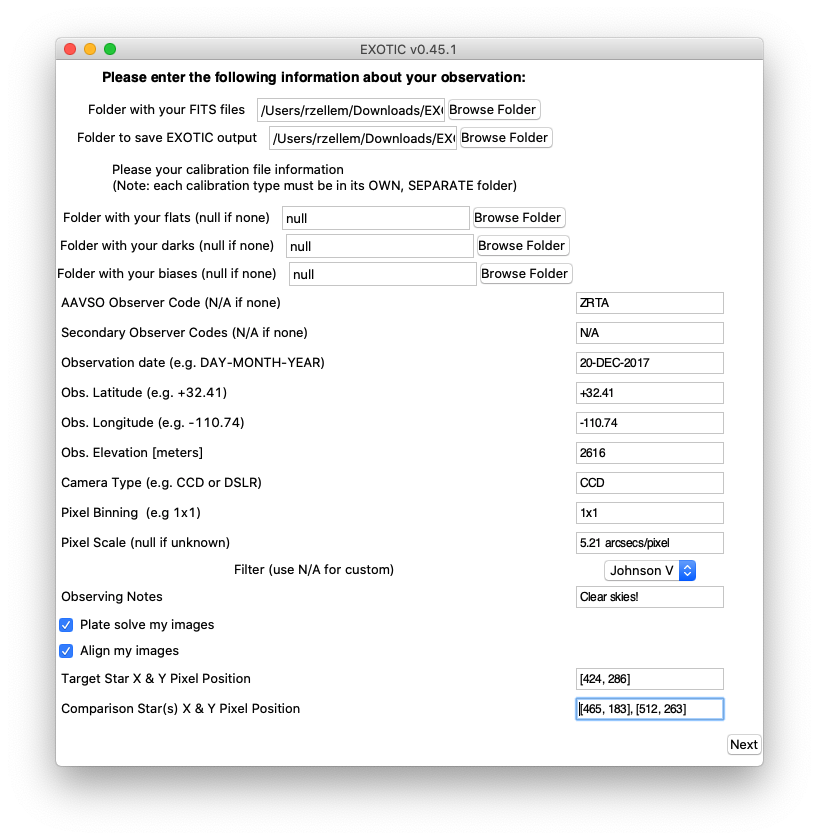
8. Now enter the information about your observing run.
- Folder with your FITS files - the folder that contains your image files from your observation run; typically, this is a file called "Downloads"
- Folder to save EXOTIC output - select where you want EXOTIC to write your output, such as final lightcurves and the file you can upload directly to the AAVSO Exoplanet Database
- Please enter your calibration file information - enter the location of your flats, darks, and biases
- NOTE: these three calibrations should be in DIFFERENT/SEPARATE folders and should *not* be in the same folder as your observation data
- If you do not have any of these calibrations, enter `null`
- AAVSO Observer Code - if you do not have one, leave as N/A
- Secondary Observer Codes - the AAVSO observer codes of anyone who helped out with your observations; if you do not have one, leave as N/A
- Observation date - the date of your observation in DAY-MONTH-YEAR format
- Obs. Latitude - the latitude of your observations, where North is denoted with a + and South is denoted with a -
- Obs. Longitude - the longitude of your observations, where East is denoted with a + and West is denoted with a -
- Obs. Elevation - the elevation of your observations in meters; note: if you do not know your elevation, leave this value as 0 and EXOTIC will look it up for you!
- Camera Type - the type of camera you are using (typically, CCD, DSLR, or CMOS)
- Pixel Binning - the binning of your pixels; if you do not bin your pixels, then please enter 1x1
- Pixel Scale - how large each pixel is in units of arcseconds per pixel; if you do not know your pixel scale, please enter null and EXOTIC will calculate it for you
- Filter - select the filter that you used for your observations; if you used a custom filter, please select "N/A" and EXOTIC will ask you for your filter specifics later; if you did not use a filter, please select either select "N/A" and then you will be prompted for wavelength information later or select the filter that most closely corresponds to your camera
- Observing Notes - enter notes about your observing run, such as weather conditions
- Plate solve my images - select if you want EXOTIC to calibrate the right ascenscion and declination of your pixels in your image via Astrometry.net; it is recommended that this option is selected
- Align my images - select this option for EXOTIC to align all of your images to provide better tracking of your stars in your images; it is recommended that this option is selected
- Target Star X & Y Pixel Position - the pixel location of your target exoplanet host star in [x-position, y-position] format
- To find the pixel position of your target star, you will need to first open your first image file in a FITS viewer, such as SAOImageDS9 (typically referred to as "DS9" for short).
- Then, you will need to find your target star in your image. To help, you can take a look at a finder chart (here's a helpful guide from the AAVSO on how to access their star charts or you can use software like the Aladin Sky Atlas) to compare to your image.
- Then hover over your target star star with your mouse and read off its pixel position (in DS9, this location is at the top-left of the window).
- Comparison Star(s) X & Y Pixel Position - the pixel location of your comparision star(s) in [x-position, y-position] format; it is recommended that you input at least 2 comparision stars and EXOTIC will automatically select the "best" comparision by the one that produces the least amount of scatter in your data
- Here's a helpful guide from the AAVSO on how to access their star charts to help select comparision stars.
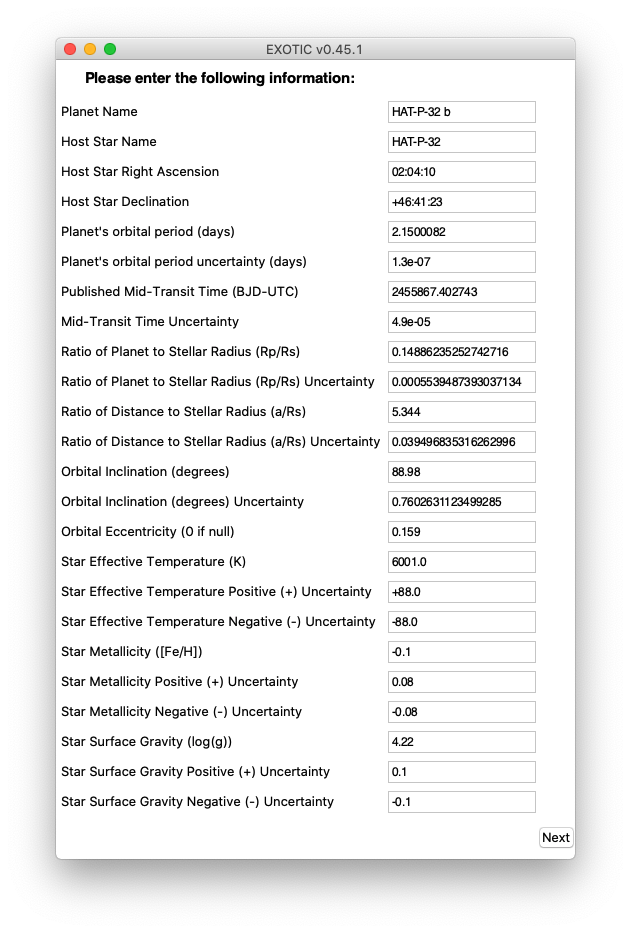
NOTE: In the screenshot below, Rob has already entered all of the information for you for the sample data (with the exception that you'll need to point to the correct directory for your FITS files and your EXOTIC Output)
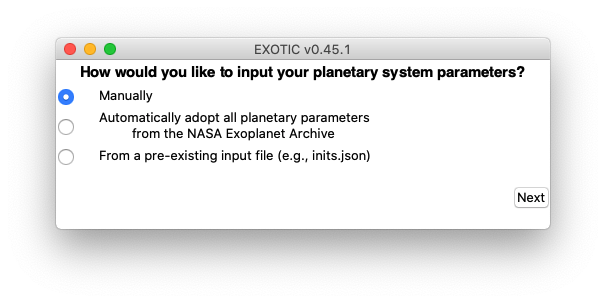
9. Select how you want to enter your planetary system parameters. For first-time users, it is recommended that you enter these "Manually". Advanced users might want to simply adopt all planetary parameters from the NASA Exoplanet Archive. If you have already input your parameters in a pre-existing initialization file, then please select the last option.
10. Enter the planetary parameters for your exoplanetary system. You can find this information on a variety of resources, but we recommend you look up your planet on the NASA Exoplanet Archive. Note to users who are reducing the sample HAT-P-32b dataset -- Rob has already filled out the system parameters for HAT-P-32b.
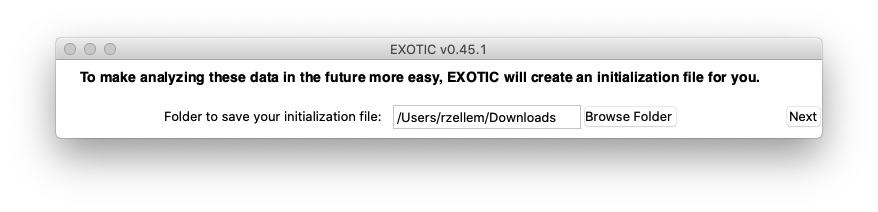
11. EXOTIC will now create an initialization file for you. This file essentially saves all of the answers to the questions and prompts you just filled out. That way, you can just bypass all of these questions the next time you reduce these observations by simply loading in this initialization file. Please select the location on your hard drive where you want to save this file. It will be then named as `inits_MM_DD_YYYY__HH_MM_SS.json` where MM-DD-YYYY is the month, day, and year and HH_MM_SS is the current time.
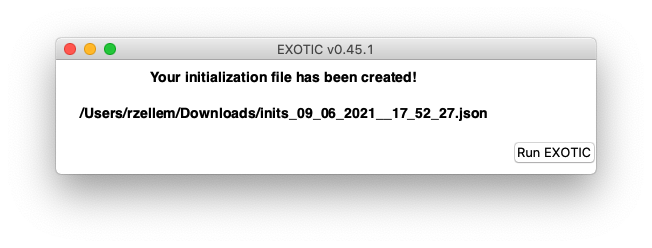
12. Congratulations! EXOTIC has successfully saved your initialization file! Click "Run EXOTIC" to launch EXOTIC and start analyzing the sample data!
13. EXOTIC is now running! Typically on this same dataset, EXOTIC will finish its analysis in ~10 minutes.